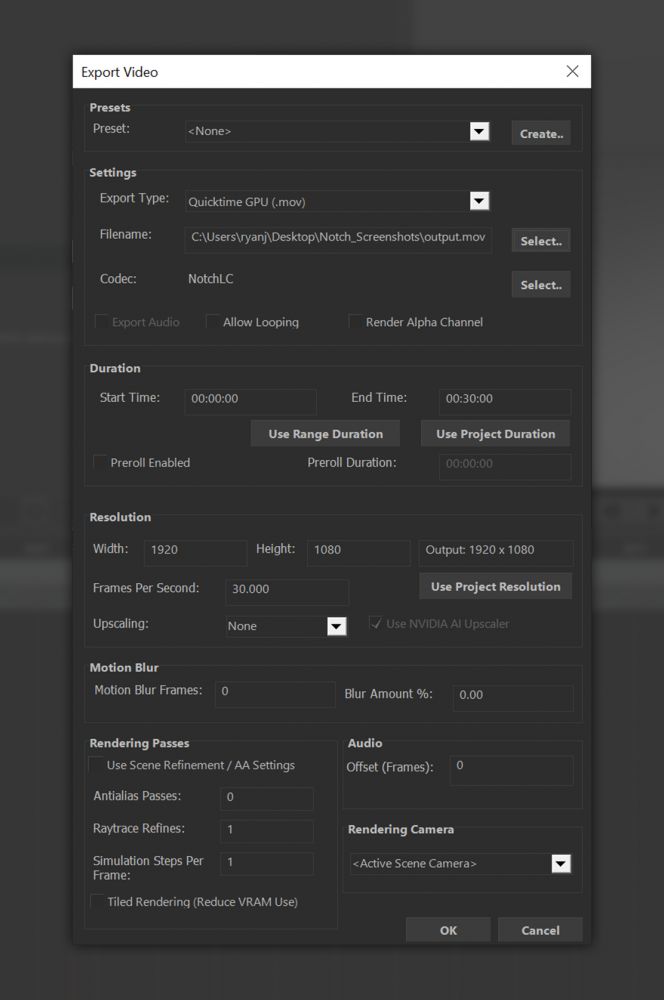
Export Video
This is the dialogue window for exporting a video from Notch.
If you’re exporting a slow scene with heavy render settings, we strongly recommend you turn off your computer’s sleep-wake settings, as this can interrupt the rendering process and cause a render to fail.
Filename Macros #
You can use macros to create unique output filenames. Each macro must be prefixed and postfixed with a % sign.
Notch supports the following variations:
| Macro | Description |
|---|---|
%YYYYMMDD% |
YearMonthDay. |
%DDMMYYYY% |
DayMonthYear. |
%MMDDYYYY% |
MonthDayYear. |
%DATE% |
Equivalent to the DDMMYYYY macro. |
%TIME% |
The current system clock time. |
%HHMM% |
HoursMinutes. |
%HH% |
Hours. |
%HHMMSS% |
HoursMinutesSeconds. |
%V% |
Single-digit version id. |
%VV% |
Double-digit version id. |
%VVV% |
Triple-digit version id. |
%VERSION% |
Four-digit version id. |
%LAYERNAME% |
The name of the layer. |
%CAMERANAME% |
The name of the camera. |
For example: filename_%YYYYMMDD%_export_%VVVV%.mov would translate to filename_20200125_export_0001.mov when saved to disk.
For theV,VV,VVV, orVERSIONmacros, if a file with the same name already exists the id is incremented by 1 until a free filename is found.
Presets #
| Label | Description |
|---|---|
| Create/Select Preset | Create or choose preset values for the rendered video. |
Settings #
| Label | Description |
|---|---|
| Export Type | Choose various export file types. |
| Filename | Choose the file name and path to the file will be saved once rendered. |
| Codec | Choose which codec you want to use, dependent on the file type chosen and the codecs you have installed. |
| Export Audio | Toggle whether to export audio along with the video. |
| Allow Looping | This allows layers to loop if the duration of the render timeline is longer than the layer being rendered. Allow Looping does not loop content, it simply allows the layer to play on longer than the duration dictates. |
| Render Alpha Channel | Toggle whether the Alpha channel is rendered with the video. This may not function, depending on which codec you choose. |
Duration #
| Label | Description |
|---|---|
| Start / End Time | Time period which will be rendered. Some effects will need some time to build up, so keep this in mind when deciding render times. |
| Use Range Duration | Uses the Range Duration set in the Timeline window. |
| Use Project Duration | Uses the Project Duration set in the Timeline window. |
| Enable Preroll | When enabled, the project will pre-render a certain time frame before the initial start time. This can help to avoid problems for some effects which are dependant on previous frames. |
| Preroll Duration | Sets how long before the initial frame the scene should be pre-rendered for. |
Resolution #
| Label | Description |
|---|---|
| Width / Height | Change the image resolution for the rendered video. |
| Output Resolution | Set resolution which will be rendered, after upscaling. |
| Frame Rate | Frame rate for the rendered video. |
| Use Project Resolution | Automatically uses the project resolution set in the Project Settings. |
| Upscaling | Upscale each frame in post, using bilinear filtering. |
| Use NVIDIA Upscaler | Use the RTX powered AI image upscaler to upscale the image. This is more accurate than bilinear filtering but not as accurate as rendering at full resolution and can sometimes introduce artefacts during the upsampling process. This requires an RTX-level GPU as well as driver version 441.12 or newer. This feature only works on 20-series NVIDIA GPUs. |
Motion Blur #
| Label | Description |
|---|---|
| Motion Blur Frames | How many frames are overlapped to generate motion blur. |
| Blur Amount | Scales the time frame between the frame before and following, within which motion blur will be calculated. |
Rendering Passes #
| Label | Description |
|---|---|
| Antialiasing Passes | An extra layer of antialiasing, calculated by re-rendering the frame with a sub-pixel offset. Increasing the passes increases the number of samples taken per pixel. |
| Refinement Passes | Controls how many refinement passes are generated, to increase the render quality of the Raytraced image. Only functions if RT is enabled in the Root Node. |
| Use Scene Refinement / AA Settings | Forces the exported video to use the same settings as are in the current viewport. This means that AA passes and Motion Blur will no longer function. |
| Tiled Rendering | Force the renderer to use tiled rendering to help reduce VRAM usage. |
Audio #
| Label | Description |
|---|---|
| Audio Offset | Offset the audio from the video playback. Can be useful with certain codecs. |
Rendering Camera #
| Label | Description |
|---|---|
| Motion Blur Frames | How many frames are overlapped to generate motion blur. |
| Blur Amount | Scales the time frame between the frame before and following, within which motion blur will be calculated. |
Command-line Transcode & Render Queue export #
Using command-line arguments, Notch Builder is able to transcode video files, image sequences and export the contents of a project’s render queue. When using command-line arguments, Notch Builder is run in batch mode and therefore does not show the application window. Logging information is outputted to the window running the batch process.
Command-line arguments (Required) #
| Argument | Description |
|---|---|
-transcode |
Transcodes an input video file from one format to another (default NotchLC, changed via the -codec argument). |
-renderqueue |
Render the entire render queue from the provided dfx project. |
Command-line arguments (Optional) #
| Argument | Description |
|---|---|
-outputwidth <width> |
Specify the output width for the resulting video file. e.g. -outputwidth 1280 |
-outputheight <height> |
Specify the output height for the resulting video file. e.g. -outputheight 1280 |
-outputfps <fps> |
Specify the output FPS for the resulting video file. e.g. -outputfps 30 |
-outputalpha <alpha> |
Toggle the export of an alpha channel. e.g. -outputalpha 1 (exports alpha channel), -outputalpha 0 (no alpha channel). Default is 1. |
-codec <codecname> |
Specify the codec to use for the resulting video file. See below table. If the |
The following codecs are supported:
| Codec | Description |
|---|---|
| h264 | The resulting video file is encoded as H.264 using FFMPEG. |
| hap | The resulting video file is encoded as hap1. |
| hapq | The resulting video file is encoded as hapq. |
| nclc, notchlc | The resulting video file is encoded as NotchLC |
Examples #
Transcode an input video to NotchLC:
NotchApp.exe -transcode "C:\input_video.mp4" "C:\output_video.mov" -codec "nclc"`
Transcode an image sequence to NotchLC:
NotchApp.exe -transcode "C:\input_image00000.png" "C:\output_video.mov" -codec "nclc"`
Transcode an input video to h264 using a custom resolution:
NotchApp.exe -transcode "C:\input_video.mp4" "C:\output_video.mp4" -codec "h264" -outputwidth 640 -outputheight 480`
Render the render queue:
NotchApp.exe -renderqueue "C:\input_project.dfx"`