Spline Cloner
Updated: 8 Jan 2026
Generates clones which follow the curvature of a spline.
Updated: 8 Jan 2026
Generates clones which follow the curvature of a spline.
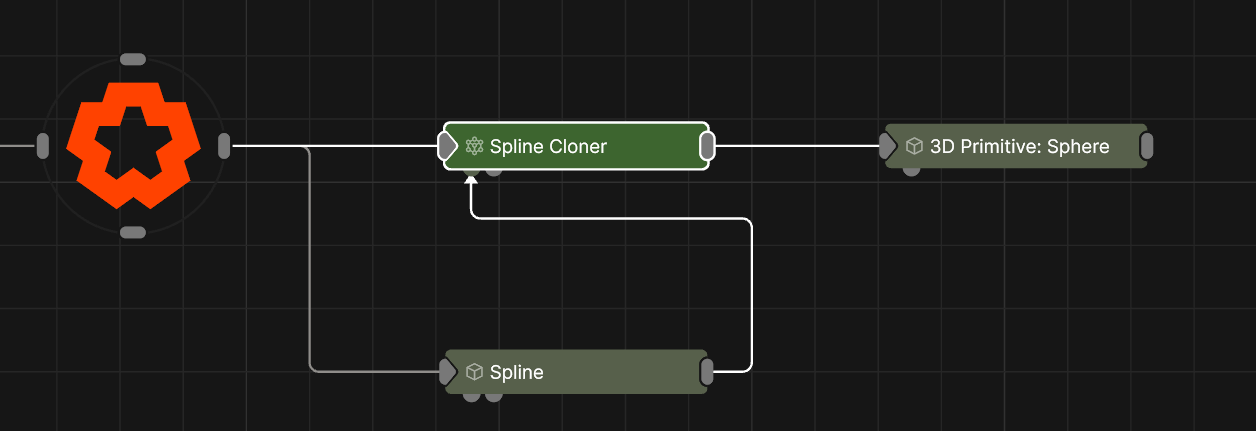
This node is used to clone objects along the spline created by an input Spline node or other source of spline data.
Nodes that are to be cloned should be connected to the output of this node. Any geometry node including 3D Objects, Lights, and Other Cloners. Clone Effectors may be connected, these nodes aren’t cloned but will act offset and transform all the clones within their area of effect.
These properties control the 3D transforms of the node. Transforms will generally be inherited by child nodes, although they can be ignored through the Inherit Transform Channels attributes.
| Parameter | Details |
|---|---|
| Position X | Changes the x position of all clones from the previous clone. |
| Position Y | Changes the y position of all clones from the previous clone. |
| Position Z | Changes the z position of all clones from the previous clone. |
| Rotation Heading | Changes the x rotation of all clones from the previous clone. |
| Rotation Pitch | Changes the y rotation of all clones from the previous clone. |
| Rotation Bank | Changes the rotation of all clones from the previous clone. |
| Scale X | Changes the x scale of all clones from the previous clone. |
| Scale Y | Changes the y scale of all clones from the previous clone. |
| Scale Z | Changes the z scale of all clones from the previous clone. |
Control the inheritance of the transforms from the parent.
| Parameter | Details |
|---|---|
| Position | Toggle inheritance of the Position from the parent. |
| Rotation | Toggle inheritance of the Rotation from the parent. |
| Scale | Toggle inheritance of the Scale from the parent. |
| World Position Only | Inherit the world position from the parent only, rotation and scale will be ignored. Overrides above properties. |
| Inherit Time | Toggle inheritance of time from the parent. |
These properties control the core behaviours of the node.
| Parameter | Details |
|---|---|
| Node Spawn Mode |
Change the order in which the cloned objects are assigned to clone instances.
|
| Num Clones | Number of copies of the input object created by the node. |
| First Clone | Chooses which clone is the first clone generated. |
| Spline Offset | Offset the clones along the Spline. |
| Spline Use Amount | What percentage of the Spline should be used |
| Spline Time Mode |
Controls how the Spline Offset moves along the Spline.
|
| Clone Offset From Spline | Randomly offset the clones from the spline. |
| Clone Scale | Scale all cloned objects, useful for matching large objects to smaller cloner systems. |
| Rotation Mode |
How the clones are rotated relative to the spine.
|
| Rotation - Use Bank | Rotate the clones bank values to follow that of the spline. |
| Scale Clones By Splines | Scale the clones based on the X scale of each of the Spline control points. |
| Static Spline Spread | Keep nodes static, so they can be culled using Spline Offset and Spline Use Amount. |
| Spline Selection Mode |
If multiple splines are combined, how are the clones distributed between each of them.
|
| Spline Index | Select the spline by index when using “Single Spline” mode. |
| Spline Index Step | Used to define the iteration step when using “Iterative” mode. |
| Colour Clones | Toggle whether the clones are coloured based on the Splines colour ramp, or retain their material values. |
These properties apply iterative offsets to the UV Offset, UV Scale, and Crop parameters of the materials for each rendered clone. Typically used with a tile sheet so that each clone picks up a different texture.
| Parameter | Details |
|---|---|
| UV Scale X Delta | Relative change to the uv scale along the x of the clone’s material, per clone. |
| UV Scale Y Delta | Relative change to the uv scale along the y of the clone’s material, per clone. |
| UV Offset X Delta | Relative change to the uv offset along the x axis of the clone’s material, per clone. |
| UV Offset Y Delta | Relative change to the uv offset along the y axis of the clone’s material, per clone. |
| Crop Left | Relative change to the crop on the left of the clone’s uvs, per clone. |
| Crop Right Delta | Relative change to the crop on the right of the clone’s uvs, per clone. |
| Crop Top Delta | Relative change to the crop on the top of the clone’s uvs, per clone. |
| Crop Bottom Delta | Relative change to the crop on the bottom of the clone’s uvs, per clone. |
The properties control the time at which the node is active. See Timeline for editing time segments.
| Parameter | Details |
|---|---|
| Duration |
Control the duration of the node’s time segment.
|
| Node Time | The custom start and end time for the node. |
| Duration (Timecode) | The length of the node’s time segment (in time). |
| Duration (Frames) | The length of the node’s time segment (in frames). |
| Time Segment Enabled | Set whether the node’s time segment is enabled or not in the Timeline. |
| Name | Description | Typical Input |
|---|---|---|
| Source Spline | Source Spline to generate clones from. A Spline must be connected for the cloner to generate clones. | Spline |
| Effectors | Control how the clones behave once spawned. See Effectors. | Plain Effector |
| Transform Modifiers | Apply the transforms of another node to this node. | Null |
| Target Node | Modifiy the rotations of the node to always direct the z axis towards the input. | Null |
| Local Transform Override | Apply the transforms of another node to this node, relative to its parent. | Null |