Anti-Aliasing
Updated: 10 Mar 2025
Updated: 10 Mar 2025
WARNING: This page will show unaliased images and video for educational purposes. There will be jaggies galore, and only intended for a mature audience. No pixels were harmed in the writing of this page. Viewer discretion is advised.
At its core, image aliasing results from an imbalance between the detail and the resolution of rendered content. Smooth effects such as gradients and lighting tend to gradually change in space, making the sampling for rendering relatively straightforward. Aliasing occurs when there are sharp and high-frequency details, with high contrast and more detail per pixel than can be sampled in a single pass.
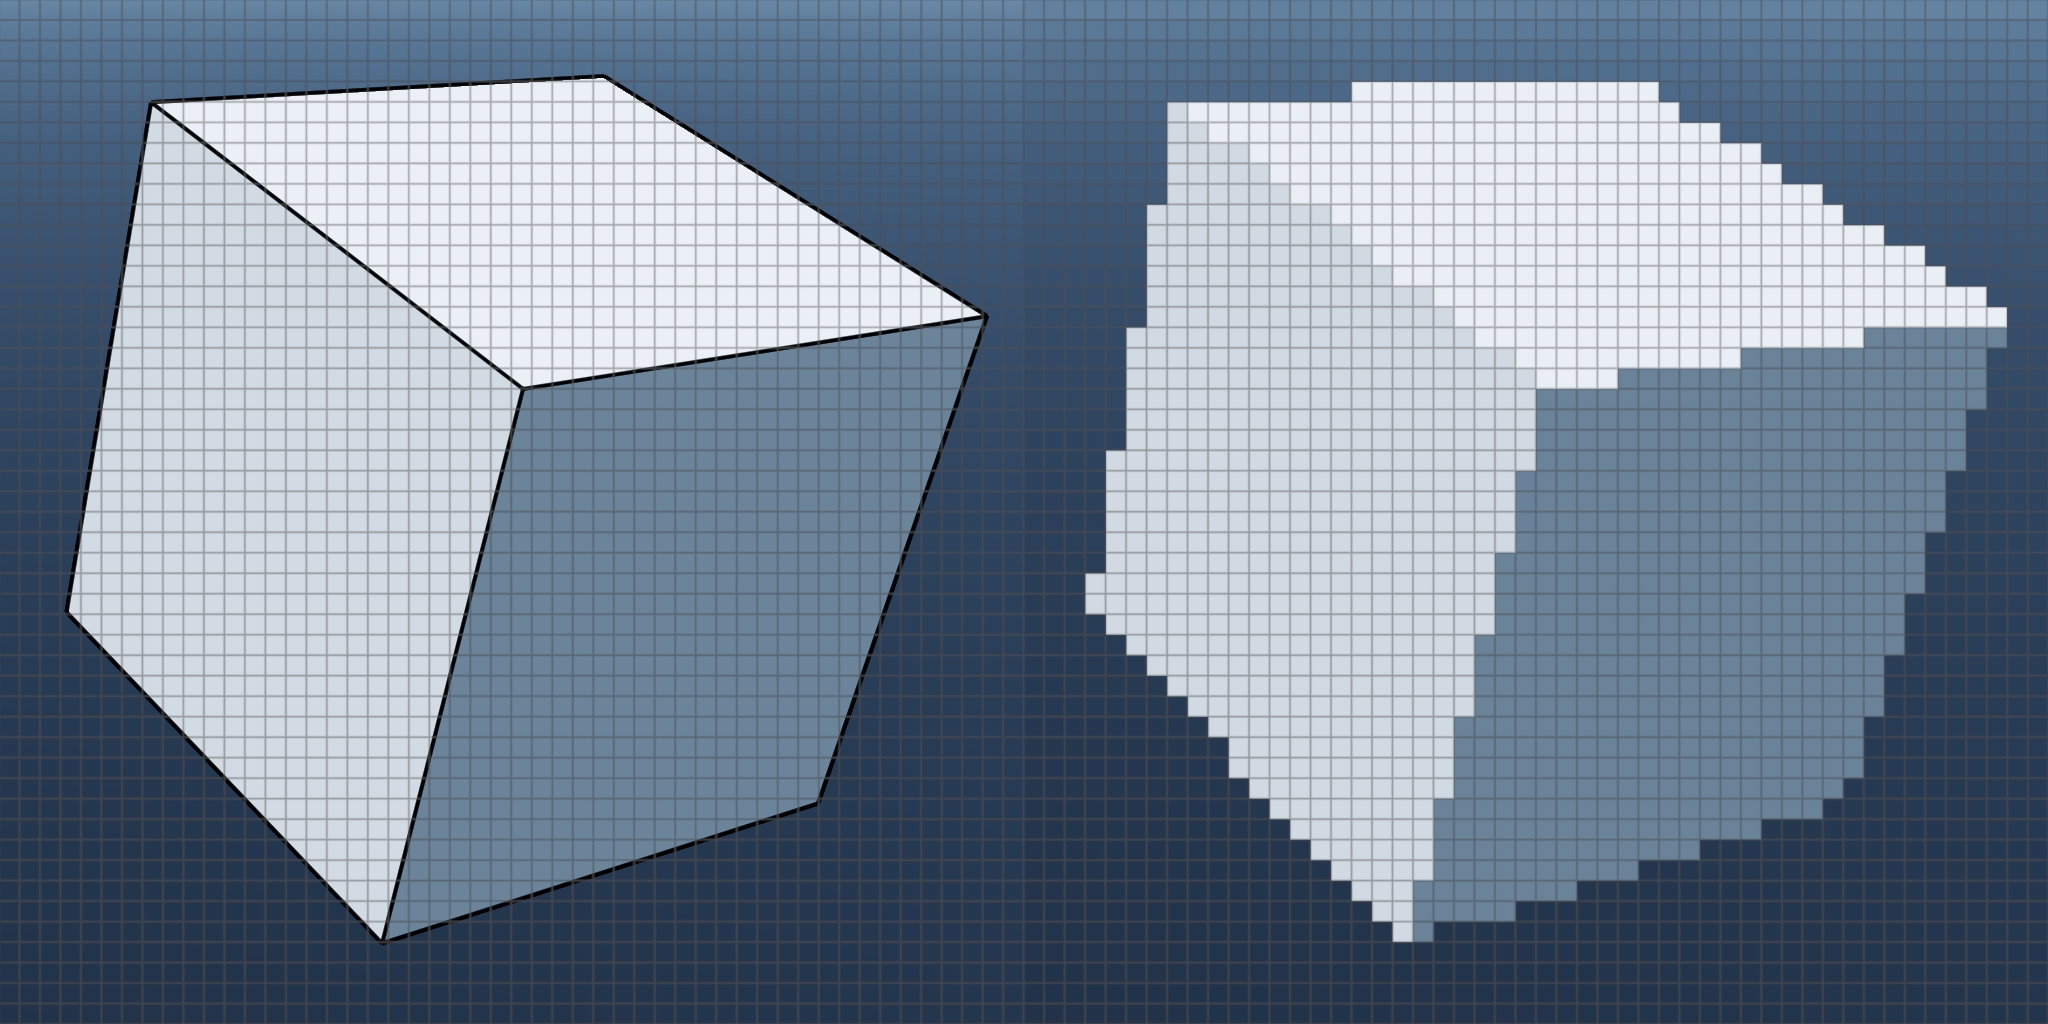
Take this simple example with no antialiasing applied and compare the shape drawn to the pixel grid below. When the object is rasterised, the pixels sample once at its centre to check if the line is touching. If the line overlaps with the pixel, it is treated as solid; otherwise, it is treated as empty. If the details are simple and spread over a large area, or the pixels are small and the eye can’t discern their differences, aliasing can be minor and ignored. However, on large canvases or under normal resolutions, aliasing can stand out as an artefact that must be addressed.
Typically, aliasing issues result in three types of image artefacts:
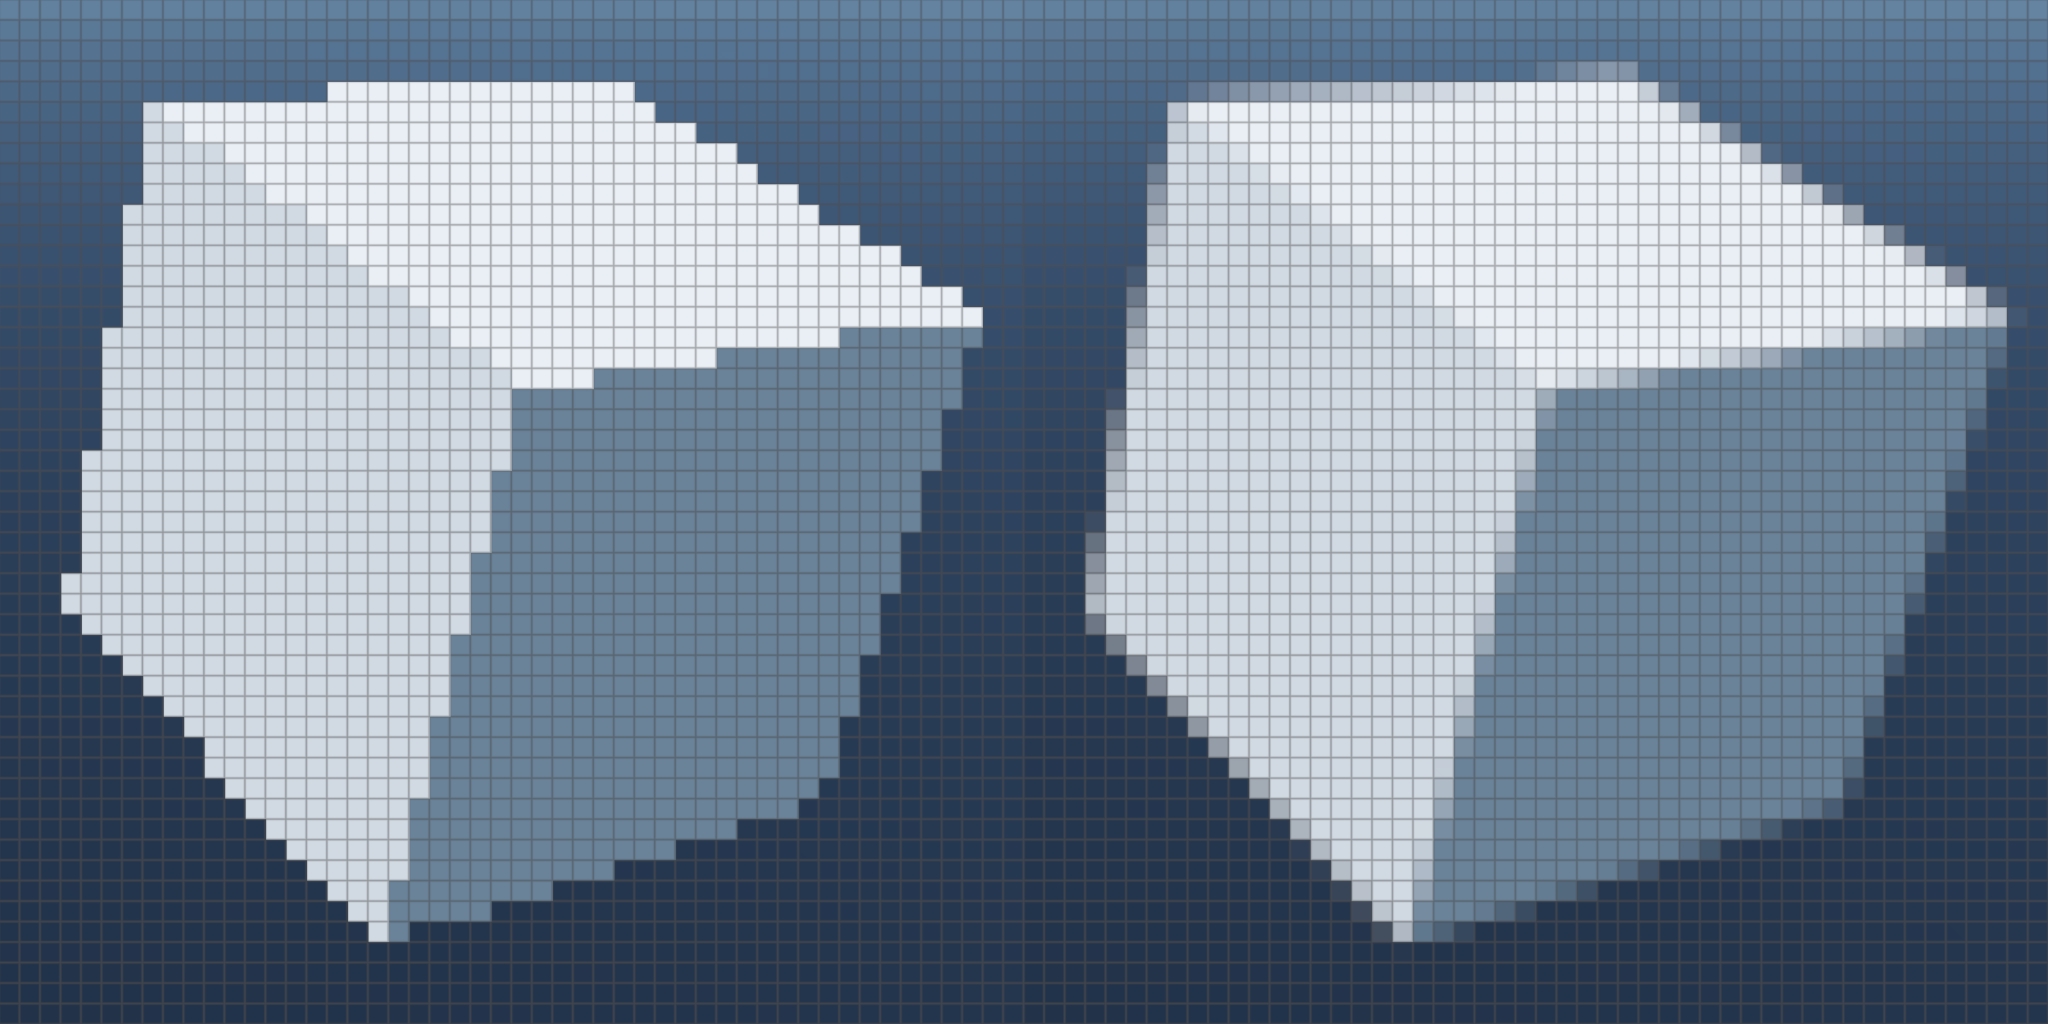
One of the most common types of aliasing in images occurs when diagonal or curved lines appear jagged, with sharp, angular steps instead of smooth transitions. This happens because the pixel grid that makes up a digital image is made up of square pixels, and when a line or curve doesn’t align perfectly with the grid, it produces jagged edges.
Typically caused by:
When high-frequency patterns or textures are sampled at a lower resolution, patterns like interference grids (moiré patterns) can emerge. This happens because the sampling process can’t capture the fine details of the original pattern, leading to a distorted or false pattern appearing in the image.
Typically caused by:
In scenes with highly detailed geometry or textures without mipmaps, noise can be introduced where the details are so small that each sample appears random.
Typically caused by:
Aliasing is a complex problem, as several factors in the render pipeline can impact it. Several methods are available in Notch to resolve aliasing, but first, we must consider where it comes from. There are three common types of aliasing: Geometric aliasing, Texture aliasing, and Shading aliasing.
Geometric aliasing is often easily visible on straight edges of meshes - generally resulting in jaggies along the edges. This is simply because the edges of meshes often won’t precisely conform to the pixel grid, creating a stepping effect on the geometry.
Cracks in polygons are also a common cause. A crack occurs where the edges of two neighbouring polygons do not perfectly match up, e.g. small differences in unwelded vertex positions that can be solved by welding them or one edge butting up against two. This must be fixed in the artwork: clean meshes are essential for a good render.
Internal geometry aliasing can often be reduced by rounding and softening the edges, with bevels or normal smoothing, but for the wider silhouette, one of the many Anti-Aliasing Methods will be necessary. MSAA and EdgeAA are particularly good techniques for reducing this kind of aliasing.
Texture aliasing occurs on textured 3D objects when textures are in a higher resolution than the pixels on the screen it takes up, also known as its Texel Density. This doesn’t just apply to the visible colour channel - specular, roughness, and this type of aliasing will heavily impact normal maps.
The best solution to solve this kind of aliasing is to fix the artwork.
Normal map and roughness map aliasing are particularly important because they directly cause another type of aliasing: Shading aliasing.
Shading aliasing occurs when processing lighting and shading. Sharp changes in normal direction may result in a huge change in brightness from one pixel to another, resulting in aliasing. Another case could be reflections. If a reflected object has a lot of details, it can also be difficult to resolve aliasing here.
This is the most challenging type to remove as it isn’t as predictable as other causes of aliasing and can require significant samples to be reduced completely.
The best way to solve this type of aliasing is through careful consideration and content preparation. Increasing bevel radii or roughness to allow for greater distance of change will help a lot, but it can be time-consuming to add to complex models. DLSS does a great job at dealing with this type of aliasing, but it does come with its own quirks. You can use the normals, texture coordinates, and other views to help diagnose this case and see which solution is most appropriate for your setup.
Shadow aliasing forms part of shading aliasing but should be considered separately. It manifests itself as jagged edges along the lines of hard shadows and is caused when shadow maps are too low-resolution for the area they are asked to cover.
Solutions to this vary depending on setup and the scene - it may be fine at long distance or at a lower resoltuion, but close up the problem may become quite evident. The options are fairly straightforward: reduce the area covered by the light, increase shadow map resolution, or soften shadows to hide the problem.
Lastly, aliasing isn’t a problem unique to 3D scenes. Video Aliasing occurs when mixing videos of different resolutions or when scaling high-resolution content to a lower-resolution output. Similar to Texture aliasing but applied to a 2D context.
The solution to this is straightforward: either lower the resolution of the video before import to better match the context it’s being used in, or change the texture filter modes on the compositing node to better sample input the video.
Anti-aliasing (AA) is the process of analysing the high-frequency areas of an image and interpolating the pixels to produce a cleaner result, either by increasing the samples per pixel or by smoothing the image in some way. These intermediate pixels are given fractional colour values, determined by averaging the colours of the neighbouring pixels and the object’s colour.
There is no one-size-fits all anti-aliasing method, each technique has strengths and weaknesses which have to be understood and worked within, so trade-offs will have to be made.


Uses the Fast Approximate Anti-Aliasing technique, which attempts to find jagged edges in the image and applies a localised blur to smooth those areas. This isn’t the most accurate method, but it is fast, flexible, and can give useful results in a pinch. Stacking multiple FXAA nodes can improve aliased edges, but too much will blur everything.
Best applied on top of scenes where other AA methods aren’t applicable, with a slight sharpen on top to undo some of the blur.

Samples geometry edges by identifying pixels hit by lines and edges of triangles and renders eight extra samples to reduce aliasing on geometry in the scene, but other pixels get just a single render. This solution works very well to anti-alias lines and the edges of triangles, one of the most obvious forms of aliasing in 3D renders, but has no effect on any other causes of aliasing.
Slows down the more geometry is visible on screen, and can impact VRAM usage.
Best applied to scenes with mostly geometry details, low-resolution textures or simpler lighting setups.


Applies an MSAA to the visibility buffer, then a single MSAA pass to all other lighting and shading passes, using the information from the visibility buffer to greatly improve the quality. This results in much less aliasing on geometry with a smaller performance cost compared to other techniques. It is not compatible with Raytracing render mode, since visibility buffers aren’t generated.
Best applied to scenes with mostly geometry details, low-resolution textures or simpler lighting setups.

Resolve aliasing through Nvidias DLSS 2.0, a method based on machine learning which utilizes data from various Gbuffer passes to improve aliasing. Often works faster than MSAA, but can introduce Artefacts, such as Trailing object motion or smudgy after images with camera cuts. It is especially important with DLSS to make sure the motion vectors in the scene are generated correctly, as bad motion vectors can create artefacts.
DLSS also allows the user to set an internal resolution scaling. This can boost performance considerably in scenes where the rendering is the main cost, but can also introduce small aliasing artefacts as DLSS struggles to upscale the subpixel details.
Best used for scenes with varying types of aliasing, without tiny object motion or quick camera cuts.

A subpixel jitter is applied to the camera to sample each pixel over time, referring to the motion vector pass to keep the visible jitter to a minimum but still generate an accurate result over time. For slow-moving scenes consisting of opaque/solid objects, it gives a great result for very little performance or memory cost and can solve all kinds of aliasing, particularly temporal flickers on geometry edges such as those caused by a slow-moving camera.
However, it only works properly for solid geometry. Transparent and alpha blended geometry can’t render motion vectors so can look inaccurate. Temporal Antialiasing is also prone to appearing blurry or jittery in some cases, and small trails can appear behind moving objects as the samples can take a few frames to converge to a clean image.
Best used for scenes with varying types of aliasing from solid geometry, and where the DLSS artefacts cannot be avoided.

Refining simply generates multiple samples of each pixel per frame with subpixel offsets, which are accumulated and averaged to resolve any aliasing in the scene. The most accurate solution, but only applicable to offline workflows.
Refining is primarily used for rendering video. There are few reasons not to use this method of AA within that workflow.
Now that we’ve covered everything, here are some best practices and tips for dealing with aliasing in your projects.
When rendering to video, the solution is thankfully simple: just use Refining. Refining works by sampling every pixel multiple times per frame, which is necessary for Path Tracers to reduce noise but is equally applicable for the real-time renderers to improve both aliasing and lighting quality. There is the cost of increased render time, but this is generally minimal and worth the quality improvement.
For the real-time renderers, 10-20 refines are usually enough to remove any aliasing that previously existed in the scene, but you may have to go higher for particularly tricky cases. For the Path Tracers, you’ll generally be using samples to reduce noise over reducing aliasing, as any aliasing will be gone long before the noise has been resolved.
For live playback in blocks or standalone applications, there isn’t room in performance to perform massive oversampling options. Therefore, some of the easiest ways to solve aliasing issues is to take steps to prevent them from occurring in the first place. Careful construction at the start scene can improve aliasing immensely, with virtually no additional cost (and often, performance benefits).
Avoid creating too much detail per pixel
Very high polygon density doesn’t just impact performance, they can also cause aliasing issues as the details differ from slightly different view angles. Optimising a mesh for real-time can have a great benefit for aliasing too.
Likewise, using high-resolution textures on a tiny object will put a lot of detail on a tiny surface, which can also cause aliasing artefacts. Simply lowering the resolution of a texture to better match with its resolution in viewspace can improve aliasing significantly.
Avoid creating super bright thin lines
Pixel and sub-pixel wide lines can be especially hard to resolve; even with antialiasing methods in use, the line can appear uneven and transparent when examined closely. This can then further impact other effects, such as glows, which can be highly dependent on the brightness of pixels, and even perfect antialiasing can’t maintain a consistent brightness.
Increasing the thickness of lines can give enough width to resolve the unevenness and fading effects and allow more information for the antialiasing methods to resolve more effectively.
Be wary of bright specular highlights
Lighting can often generate very bright spots in a scene, which can generate aliasing along sharp bevels or within reflections. These can be particularly tricky to antialias because they can only be detected after the scene has been lit, and averaging the sharp change in brightness generates a lot of aliasing.
Solutions here generally involve increasing the roughness of a surface to smooth out where the specular area hits or adding softness to the emit light by projecting gradient textures (particularly for Area Lights).
Pay attention to Mipmaps
These properties are mainly applicable to textures applied to materials in a scene, which can be difficult to apply traditional AA methods to.
Mipmaps are automatically generated and applied to textures in Notch, helping to reduce aliasing in a scene. The solution essentially involves storing multiple copies of an image at lower resolutions and swapping them out depending on the distance to the camera. A lower-resolution texture generally has reduced high-contrast details and, therefore, reduces aliasing.
This process can introduce some blurriness to textures at low angles, so the Texture Mip Bias on any material node can be used to bias the mipmap swaps closer or farther from the camera. Raising the value will soften details in a texture and reduce aliasing while lowering the value will do the reverse.
This was rendered with the texture filtering mode set to point to exaggerate the mipmaps; in other modes, the mipmap blends are seamless.
Pay attention to Texture Filter Modes
Any image needs to be filtered when its relative resolution changes. Whether that’s a simple scaling in 2D, or its location on a mesh in 3D, the chosen Texture Filter Mode will dictate how to blend from one pixel to another.
In the case of reducing aliasing, setting the UV Texture Filter Mode to Oversampling applies 64 samples per pixel to the texture, dramatically improving this form of aliasing. However, this does come with a greater performance impact, so other methods (such as adjusting the mipmaps) should be investigated first.